Stash Bash Pinterest Style
Hi again to everyone from the UPB12!

5 Minutes For Mom
All this week I have been working up to my son's 4th Birthday Party and a very good friend of mine is having her daughter's 1st Birthday party the very next day. I am planning BOTH of them. I have to make 3 dozen cupcakes and two small birthday cakes. Yikes! But I am loving every minute of it. Thanks to Pinterest, the ideas are coming together quite nicely.
I'm linking up again to Project Pinterest, sharing great ideas we try out from Pinterest with some really great ladies.

Today is Stash Bash day, and I'm using some Pinterest ideas to get me going. The idea of Stash Bash came from fellow blogger Crunchy Catholic Momma. The goal is to use up supplies/excess/had-to-buy-it items before buying new things to craft with.
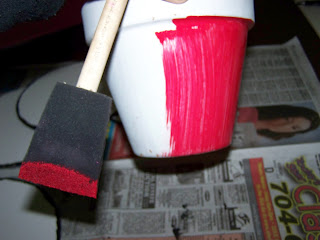
My son's party theme is Disney Cars. Through my searching pin boards, I found this really cute set up. I really like the flower pots that were turned in to decorations. I had some extra flower pots laying around that I actually started to paint last summer. Here's a picture showing one spray painted (right) and the other with acrylic paint (left).

I used a real cheap spray paint so that could be the reason for the runs in it, but I just really prefer acrylic paint. Plus I always have it on hand.
There were no directions with this link that I found, so I came up with my own version. I started with a coat of red paint on each of them, 2 coats, letting it dry in between. Next I painted the rims in black (2 coats as well). Once they were dry I took them outside and coated them down with Alleene's Acrylic Sealer Spray.


I took the cardboard cake bases and painted the outside edges black, just in case they were able to be seen when everything was done. I don't really think it was needed after all, but I would have been sick had I finished everything and wished I would have.
Next I coated one side of each circle with Mod Podge and affixed the scrapbook paper to one side of each. (you should have 4 circles covered on one side only with scrapbook paper.)


Here is where it gets interesting. I burnt my finger not long after this, so if you are using a glue gun make sure you have a pair of tweezers handy to help you with this next part. Or use super glue/e6000. I'm impatient and didn't want to wait on the glue to dry.
I took some red tissue paper I had laying around, folded it in half and then half again. I cut it apart on each of the folds.


I took these small pieces of tissue, stuck a pencil (eraser end) in the center of it and squished it into a cone like shape.

I started hot gluing these pieces to the back of each circle, around the wooden dowel. This is also how I burnt my finger. Hot glue tends to seep right through tissue paper. Nasty little burn.


Continue this process until it is full, and you will do this to both circles that have a dowel rod.

Add some glue all around the center of your "flower", then affix the circle without a dowel rod to the center. Now you have a double sided "flower".

I used up some green floral block I had leftover from my daughter's birthday party for the center of the flower pots. Now when I stick the "flower" in the flower pot, the dowel rod will stand up straight. To cover the inside I just crinkled up extra pieces of tissue and stuffed it in each one.


5 Minutes For Mom
All this week I have been working up to my son's 4th Birthday Party and a very good friend of mine is having her daughter's 1st Birthday party the very next day. I am planning BOTH of them. I have to make 3 dozen cupcakes and two small birthday cakes. Yikes! But I am loving every minute of it. Thanks to Pinterest, the ideas are coming together quite nicely.
I'm linking up again to Project Pinterest, sharing great ideas we try out from Pinterest with some really great ladies.
Today is Stash Bash day, and I'm using some Pinterest ideas to get me going. The idea of Stash Bash came from fellow blogger Crunchy Catholic Momma. The goal is to use up supplies/excess/had-to-buy-it items before buying new things to craft with.
My son's party theme is Disney Cars. Through my searching pin boards, I found this really cute set up. I really like the flower pots that were turned in to decorations. I had some extra flower pots laying around that I actually started to paint last summer. Here's a picture showing one spray painted (right) and the other with acrylic paint (left).

I used a real cheap spray paint so that could be the reason for the runs in it, but I just really prefer acrylic paint. Plus I always have it on hand.
There were no directions with this link that I found, so I came up with my own version. I started with a coat of red paint on each of them, 2 coats, letting it dry in between. Next I painted the rims in black (2 coats as well). Once they were dry I took them outside and coated them down with Alleene's Acrylic Sealer Spray.


Now for the next part I did purchase something new, but it wasn't absolutely necessary. I just chose the easy way out. I purchased a 6 pack of small cardboard cake bases at Hobby Lobby for $1.99. I took one and laid it on some scrapbook paper (stash bash!) and traced the circle. I cut out 4 of these.


I took the cardboard cake bases and painted the outside edges black, just in case they were able to be seen when everything was done. I don't really think it was needed after all, but I would have been sick had I finished everything and wished I would have.
Next I coated one side of each circle with Mod Podge and affixed the scrapbook paper to one side of each. (you should have 4 circles covered on one side only with scrapbook paper.)


I flipped them over and hot glued a wooden dowel rod (yes from my stash :) ) to the middle of 2 of these circles.

I took some red tissue paper I had laying around, folded it in half and then half again. I cut it apart on each of the folds.


I took these small pieces of tissue, stuck a pencil (eraser end) in the center of it and squished it into a cone like shape.

I started hot gluing these pieces to the back of each circle, around the wooden dowel. This is also how I burnt my finger. Hot glue tends to seep right through tissue paper. Nasty little burn.


Continue this process until it is full, and you will do this to both circles that have a dowel rod.

Add some glue all around the center of your "flower", then affix the circle without a dowel rod to the center. Now you have a double sided "flower".

I used up some green floral block I had leftover from my daughter's birthday party for the center of the flower pots. Now when I stick the "flower" in the flower pot, the dowel rod will stand up straight. To cover the inside I just crinkled up extra pieces of tissue and stuffed it in each one.

I looked and looked for Cars stickers but had no luck. Then I finally remembered I had purchased some wall clings from Avon about 2 years ago to put up on my son's wall after we painted the room. Unfortunately the room never got painted and I forgot about them. Perfect timing to remember!

Ta Da!
Whew, that was a long post! What do you think of the flowers? Are they boyish enough? Did you find this post helpful or too lengthy?
Remember to stop by the Project Pinterest and link up your own creations and see what everyone else is up to as well. Thank you to Sandee and Sarah for co-hosting Project Pinterest! Stop by their blogs and visit a while, they are both very nice and very helpful!
Stop back by tomorrow for a fun tutorial!
Amy~The Dixie Diva

These are GREAT! I bet your little guy loved them too. I have been toting around craft supplies for so many years, yet I keep buying new. I need to use them all up first before I buy any more!
ReplyDeleteThanks for linking up!!!!
Hey Amy, wow, they turned out fantastic! Sorry about your finger, I've done that too!! I think you did an awesome tutorial and I hope you've pinned it too so that other people can see your instructions! I think they are great boy flowers!! Thanks for linking up to Project Pinterest, waving hi from the hills of North Carolina :)
ReplyDelete